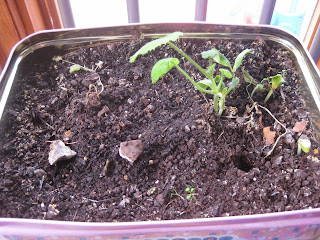
WEEK 1:
Just put dirt in the pumpkin and let the seeds sprout. Genius! I cut the pumpkin open and we talked about what was in there, what it looked like, what they thought about the inside of the pumpkin. Then they each got to put some dirt in the pumpkin... and we're just waiting for a sprout! (All that day they kept coming to tell me that we didn't have anything growing yet. I don't think they really believe me that it's going to take a couple weeks. =])
WEEK 3: There was nothing more fun than coming in each day to see if anything had changed in our pumpkins. This week we finally saw a sprout!
WEEK 4: The original sprout got so tall quickly and we had some more popping up!
WEEK 5: Right before the long Thanksgiving Weekend, I noticed that the pumpkins were starting to get soft on the bottom and sides, so I decided to plant them under some dirt. They were sprouting like crazy.
WEEK 10: I had been regularly watering the plants, and unfortunately we had a little bit of a set back when the first batch of sprouted plants died. They seemed to mostly come from one of the pumpkins, and then the other one began to sprout! On these sprouts we also got to see the first real pumpkin leaves. Very exciting!
WEEK 15: The pumpkins really started to comeback strong after half of the sprouts withered away.
WEEK 18: The pumpkin plants had been growing steadily and were doing really great. This week we had noticed that there were little "bud pods" and the kids could not wait to see what they would become.
WEEK 19: The pumpkin plants had been growing like crazy and were quite full of sprouts, and we were still getting some sprouts. We learned that the flowers can be either male or female. The male flowers are on the end of just a long vine, and the female flowers have that small little ball at the base of the flower (what becomes the pumpkin).
WEEK 26: Our school does an art show every year, and this year's theme was "In the Garden". One of my class's projects for that was to paint pictures of our amazing pumpkin plant.
WEEK 28: The pumpkin plant had really been thriving and had filled out their container. I wanted to make sure that they could grow more, so I moved them outside into the school garden!
WEEK 30: The pumpkins took to outside really well! They basked in the sun and flourished!
WEEK 33: It seemed like everyday I looked at the plant outside it just got bigger and bigger. Some of the leaves were so large that they were bigger than my head. Incredible!
WEEK 34: A baby pumpkin!!
WEEK 36: The main part of the pumpkin plants unfortunately became infested with some sort of bug and was starting to rot. Most of the plant had to be pulled and I was only able to leave a few of the sprouts in the ground. At that point there were two pumpkins on the vine.
WEEK 45: I didn't do anything with the pumpkins, because I heard that the pumpkins might keep ripening, even off the vine. I waited as long as a I could (until I noticed that the stem was starting to get a little moldy). It turned orange! Even the little one started to change to orange.
I wanted to cut the pumpkins in half, because one of our projects during Halloween week was to talk about the parts of the cross section.
The pumpkin was still good so I saved some for the bunnies and my rats (they'll be psyched!) and I was able to save most of the seeds from the large pumpkin. Not sure what I'm going to do with them yet... Maybe plant some more pumpkins? =]


No comments:
Post a Comment